- Creating a Command
- Application-based Events
- Location-based Events
- Time-based Events
- Confirmation of Command Execution
What It Is
E-Robot is an automation application which makes it possible for your device to execute commands automatically – all you need to do is define these commands. When you create a command you can specify which actions to execute when a given event occurs. In the Pro version you can set conditions for both events and actions.
The application allows you to specify more than 130 event types and execute more than 50 action types; furthermore, all event and action types can be parameterized, making the app even more versatile, and its functionality may be expanded in the future. E-Robot can handle events which are location-based, time-triggered, application-handled, and more. It can of course execute Elixir 2 profiles as well, so you can automate profile activation easily.
Commands can also be executed manually from the application itself or using shortcuts, and not just automatically as a result of specific events occuring.
Creating a Command
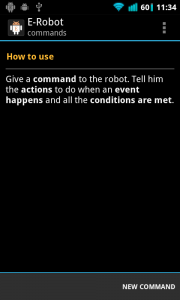
After the application is launched, the welcome screen appears and briefly explains how the program works; following this, click NEW COMMAND at the bottom:
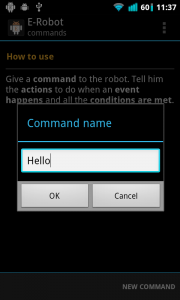
Give the command a name and click [OK]:
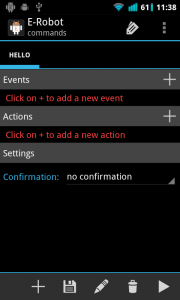
After this you will see the main commands screen, which links together Events and their accompanying Actions. The name of the current screen appears top left, next to the icon:
Continuing with the top line there is the “tags” icon, which allows you to organize your commands into GROUPS, and the final icon next to it is a menu which makes it possible to access other features of the application, including E-Robot’s settings.
The next row down contains tabs, one per created command, each bearing the command’s given name. You can jump from one command to the next using these; in the screen capture above there is only one command created (“HELLO”) and so it is the only tab in evidence.
The space which begins below this tab row and which extends almost to the bottom (the “middle” of the screen) is reserved for the definition of the selected command.
Finally the toolbar at the very bottom contains icons which execute actions pertaining to the selected command (as selected using the tabs), and so you can save, rename, delete or execute the command using these (the “+” sign that appears first is to create a new command.)
A command is simply an event→action declaration, i.e. if event(s) occur(s), as defined by you, then you want action(s) to be executed. We have already declared a “HELLO” command; we will now define it to display a welcome notification message whenever the screen is turned on. Thus, in this case event will be defined as the screen turning on, and action will be defined as displaying the specified message. We will begin by adding this event using the + sign on the line marked Events, under the “HELLO” tab:
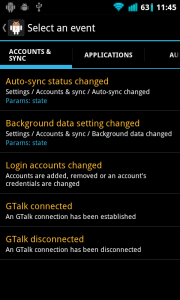
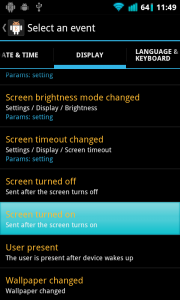
The event selector screen appears (as witnessed next to the icon top-left) where you define the event. Because of their large number, event types are organized by group, again using tabs (ACCOUNTS & SYNC group, APPLICATIONS group, etc.) Scrolling right through the group tabs will reveal the DISPLAY tab we will use to define this event; you can also click the name of any other tab (convenient if you were already there for another purpose) and you will be presented with the tab header names of all event groups. Using either method go to the DISPLAY tab and select the desired event, which in this case is Screen turned on (Sent after the screen turns on):
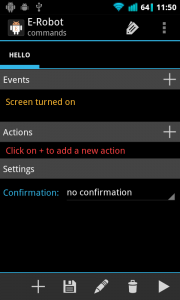
The selected event appears on the commands screen:
We have defined the event; now we need to define the action to take in case of said event, which is done in virtually identical fashion: click on the + sign on the line marked Actions, go to the OTHER tab (again by scrolling or via list selection by clicking any other tab header) and select Display a notification (Post a notification to the status bar). You will see that this action can be parameterized:
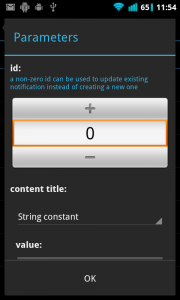
Parameters allow us to configure the action according to need; in this case, scroll down a bit to content text: and its associated value: field below, and type “Hello” (which is the text we wish to display whenever the screen will be turned on as per our “HELLO” command definition). Leave the other parameters untouched for now, then click [OK]:
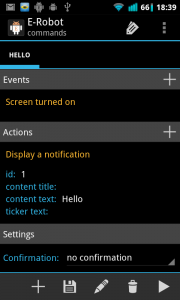
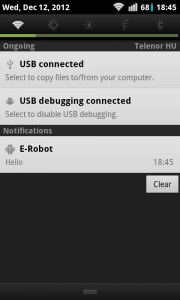
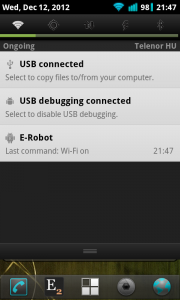
Our first command is now ready; save your work by clicking the second icon on the toolbar at the bottom. Note that by clicking the execute icon (bottom toolbar, far right) we can test-run our “HELLO” command on-the-fly before trying it for real by power-cycling the display (in this case); either way, pull down the status bar after executing the command and observe the new notification you created, which appears along with the E-Robot logo and the current time:
Application-based Events
Application-based events allow you to execute actions based on application-type events, such as an app launching (i.e. if such-and-such app launches, then do this), stopping, receiving focus, or losing focus. Oftentimes the same commands will be useful for more than one application, so it is useful to organize applications into groups and refer to these app groups as a unit when they are to be part of a command definition.
For example, let’s assume we want to turn Wi-Fi off when using certain applications, because we don’t want them to use internet, but we do want Wi-Fi to be on when certain other apps that really need it are in use. This will be the focus of our next example.
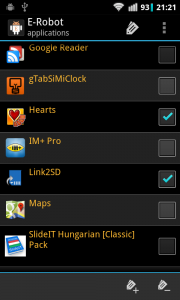
First we need to create a new application group for the apps we don’t want to use Wi-Fi (so the apps which will not be part of this group will automatically be the ones which do need Wi-Fi): using the top right-hand corner menu, select Applications. E-Robot will take a moment to scan the apps installed on your device, then present these apps in list form. At this point we select the applications for which we want Wi-Fi to be disabled (select some apps on your device which you know do not need network access, such as certain games (Hearts® in the example below) and most utilities (such as Link2SD® below). You would not, of course, select an application like Maps®, which cannot function without network access (if unsure, leave the app unselected):
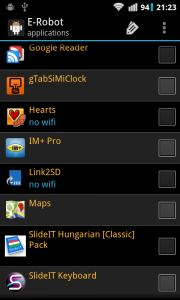
When selection is complete click on the left button of the toolbar at the bottom (with a “+”) to add these applications to a group, then click the [New group] button and select a name for this app group – in this case we will name it “no wifi” – then click [OK]. Looking at the app list now we can see which apps belong to the “no wifi” group because the group name appears in blue below the app name:
We have sorted our apps by creating the “no wifi” group; now we need to leave the Applications screen and go back to the Commands screen to create the commands which will turn Wi-Fi ON and OFF. How E-Robot will determine whether Wi-Fi should be ON or OFF will depend on which application is currently receiving focus. For example, if we are playing Hearts® the focus is on that game, and since Hearts® is in the “no wifi” group, we will define our Wi-Fi OFF command to say that if the “no wifi” group is currently receiving focus (we do this by defining the group itself as a parameter inside the command), turn Wi-Fi OFF. Conversely, if we are using Maps® the focus would be there instead, and since Maps® is not in the “no wifi” group, we need to define our Wi-Fi ON command to say that if the “no wifi” group is not currently receiving focus (again, by defining it as a parameter inside the command), turn Wi-Fi ON.
In brief then, the steps for creating action “Wi-Fi OFF” are:
- Using the top right-hand corner menu, select Commands
- Create new command “Wi-Fi OFF”
- Find event Application group received focus and use it (with parameter “no wifi” group) to define the “Events” field in command Wi-Fi OFF
- Find action Toggle Wi-Fi and use it with parameter value off to define the “Actions” field in command Wi-Fi OFF
Now create action “Wi-Fi ON”; the steps are identical to above with one exception: the event this action is concerned with is Application group lost focus (i.e. lost focus instead of received focus, as for Wi-Fi OFF).
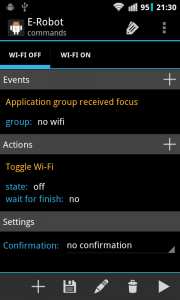
If done correctly, the screen will look like this:
When you launch an application from your defined “no wifi” group, Wi-Fi will be turned off automatically and if you pull down your device’s status bar you will see this notification:
… and when you are doing anything that does not involve an application from the “no wifi” group, Wi-Fi will be turned on again automatically and the notification message will look like this:
Location-based Events
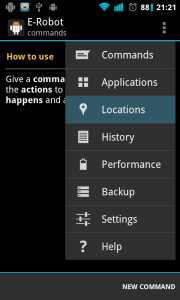
Some may find the ability to create location-based commands one of the most useful features of E-Robot, giving your device the ability to operate with different settings based on your location. Before creating this type of command we need to first tell E-Robot how we define our locations. As before, we begin with the top right-hand corner menu, only selecting Locations this time:
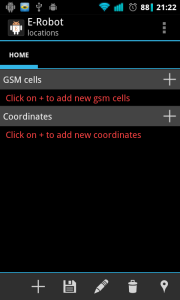
A “How to Use” message will appear; read it, then click NEW LOCATION and select a name (“Home” in the example below). The screen will look like this:
Locations can be defined using cells (GSM or CDMA) or map coordinates. Many people are acquainted with the idea of latitude and longitude-based map coordinates, but perhaps not as many with cells. By “cell” we just mean the area around a cell phone tower base station. Your city has a great many such towers because their effective range is limited, so just think of your city as having been “chopped up” by your carrier into cells with a communication tower in each cell. So using cells to set location just means using the cellular towers closest to you to pinpoint your location.
Cell-based positioning is less accurate than positioning via map coordinates but requires quite a bit less power. Coordinate-based positioning is more accurate but needs either GPS or at least mobile networks to be on.
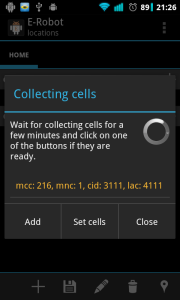
To use cell-based positioning for your current location, click the “+” sign at the far right of the “GSM cells” row (your own device may show “CDMA cells” here, but for purposes of this example the text will make reference to GSM as it is still the most widely used cellular technology in the world). Depending on your location you may get results quickly or it may take a bit longer. In any case, click on “Collect data …” now and let E-Robot scan for area cells:
It is suggested you let E-Robot scan for at least 5 minutes to collect data on as many adjacent cells as possible, as it will sometimes take that long to obtain more than a single result. If doing this for home, as in the example, you may get a better result if you walk around your house. And as a final point on the matter, you may find that opportunities arise that let you add new cell info to a location (this will be made clear further along in this section). Whenever you are ready to have E-Robot save the scanned info to the selected location, click on the [Add cells] button.
To use coordinate-based positioning for the same location, simply click the “+” sign at the far right of the “Coordinates” row and tap the “pencil” icon that will appear. The screen will change to the familiar “Maps” look with your location appearing using a red marker. Move the marker to your current location, which may or may not be directly over a blue dot (the blue dot is your device’s idea of your current location using mobile networks alone or mobile networks with GPS enabled) and click [OK], then click [OK] again.
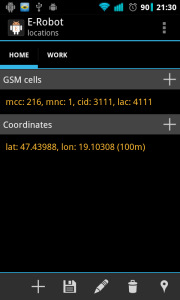
The screen capture below shows the results of both of the above procedures being performed on a HOME location, with the info from a single cell appearing under “GSM cells” and the latitude/longitude info for the same location appearing under “Coordinates”. A second location (“WORK”) has also been created, although we cannot see its data here:
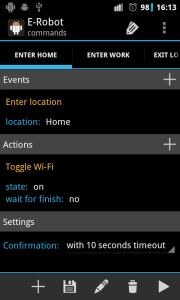
At this point you would go back to the Commands screen using the main menu and create the command(s) you wish your device to execute when you find yourself at the locations you have defined (eg. HOME and maybe WORK). You would define your event by searching for Enter location” under the LOCATION & SECURITY tab and pointing to the “Home” (or “Work”) parameter from the list which would now appear. You would then choose to toggle Wi-Fi ON (for example) under the WIFI tab, which would accomplish the goal of always having Wi-Fi turned on when we are at home. The “with 10 seconds timeout” confirmation at the bottom is simply the user’s preference of having a notification message appear for ten seconds upon action completion, in this example:
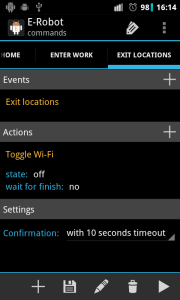
Assuming we have defined only two locations, HOME and WORK, can we specify what we would like E-Robot to do if we are at neither location? The answer is yes, we can do so using Exit locations” which is also under the LOCATION & SECURITY tab. Below we see a command which has been created to ensure Wi-Fi is OFF when we are at neither location:
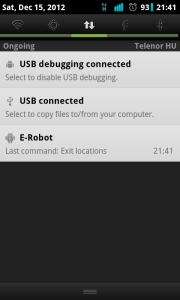
As a final word on location-based events, note that it is technically possible that E-Robot believes you have left a location that you have not really left and acts on it, by, using the above example, turning Wi-Fi off. The way this can happen is if your device communicates with an adjacent cell you hadn’t yet added to your current location, probably because it was not visible at the time you had defined the location. If this were to happen you would be able to see it in the notification area (note at 21:41 “Last command: Exit locations”):
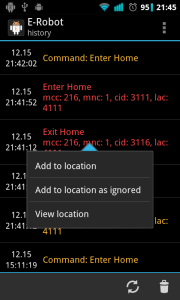
If you were to then click on this notification you would access the History screen (which is also always accessible through the main menu) on which you could see a history log of executed commands:
Using the History screen would allow you to determine why in this case E-Robot thought you were no longer in any of your defined locations. For example you would be able to see the cell info that was not defined as part of your location and which consequently triggered the corresponding exit action(s). If you know you really were at the location in question, you could click on the row in the History with the new cell data and add it to the location, but you may also choose to define the cell as an “ignored cell (by clicking “Add to location as ignored” in the screen capture above). You would do this if it was a “fluke”, meaning in this case that your device communicated with a remote cell, as occasionally happens. Adding the fluke cell to the location as an ignored cell offers the advantage that, if it were to ever happen again, E-Robot would not react as if you left your location (unlike the first time), but neither would E-Robot react as if you entered your location were it to encounter this cell (and thus erroneously trigger “Enter location” commands). It is in this important way that “Add to location as ignored” differs from the more basic “Add to location”.
Time-based Events
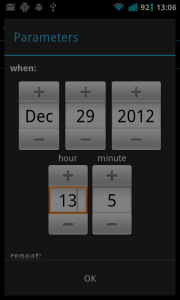
You can schedule actions to occur at predetermined times using the Alarm event to be found under the DATE & TIME tab. These alarms can be one-time events or repetitive. Clicking the “Alarm” event brings up the screen below, where the desired date and time of the event can be specified:
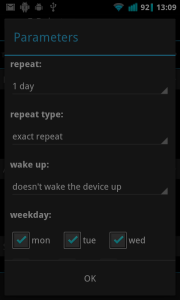
Scrolling up reveals parameters which can be set, such as the repeat interval for a repetitive alarm, as well as which day(s) of the week it should be active:
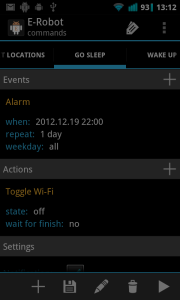
One use for a repetitive alarm event is to turn certain things on or off at the same time every day. For example, keeping the device from continuously scanning for Wi-Fi network connections at night would be useful in preventing unnecessary battery drain. A command to accomplish this might look something like the screen capture below, which shows a command which will turn Wi-Fi off at 10:00 PM (22:00) every night:
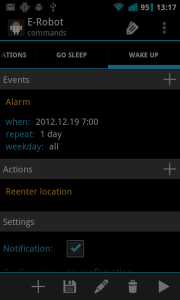
It would then be desirable to allow Wi-Fi scanning to resume every morning. But instead of just creating the obvious Wi-Fi On command, why not use your location in the morning to determine Wi-Fi settings? This is a neat way of combining two features of E-Robot. It works like this: first, you need to already have your Wi-Fi-related location-based events defined, as explained in the previous section (i.e. events that do “when I’m here turn Wi-Fi on” and “when I’m there turn Wi-Fi off”). Once those are set up, you can set up an alarm here like in the previous example but eg. for 07:00 AM, only when it comes to defining your action you would choose, from the LOCATION & SECURITY tab, Reenter location (instead of simply “Toggle Wi-Fi”). This would have the added attraction of deciding how to toggle Wi-Fi in the morning based on your location at that moment, instead of just turning it on blindly. This is what was done in the screen capture below:
Confirmation of Command Execution
As expected, all of the command examples in this documentation perform their action(s) based on their respective command’s associated event(s), as defined by the user, but they also have one other thing in common: the actions are all performed automatically once the conditions are met. Is this not to be expected? It certainly is, as it is the basic idea behind E-Robot. But we need to introduce here an idea we have not yet considered: the fact that automatic command execution can, in certain instances, actually be annoying.
Let’s imagine we created a command that automatically turns Wi-Fi off at 10:00 PM (22:00) every night, because we tend to retire for the night shortly thereafter (we have seen such an example earlier in this documentation). But what if, once in a while, you wish to continue using your device – AND therefore Wi-Fi – for a while longer, say an extra hour or so. It would obviously be irritating if your device automatically toggled Wi-Fi off at 10:00 PM on those nights. If this were to happen you could just manually turn Wi-Fi back on of course, but this would defeat the purpose of E-Robot somewhat.
E-Robot has foreseen such eventualities and offers a more elegant solution by allowing one to specify that a time-delimited confirmation be associated with the execution of a command, allowing the user to postpone (or outright block) execution of said command.
As can be seen in the screen capture above, command confirmation is enabled simply by clicking the “Confirmation” field that appears toward the bottom of the screen when defining commands. A choice of time spans (eg. 10 sec, 30 sec, etc.) will appear, or you can choose “no confirmation” if you’ve thought better of it. Confirmation of command execution may be specified whenever the field appears under “Settings” on the Commands screen where commands are defined.
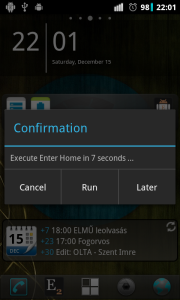
Note that confirmation of command execution is only useful if the device’s user (you) are physically close enough to the device at the time it was set to appear; otherwise, the command will execute automatically after the specified confirmation time has elapsed. If you are present, you will see the popup confirmation (see final screen capture below) and may choose to outright cancel execution of the command (“Cancel”), execute it immediately after all (“Run”), or postpone execution (“Later”):
If you choose to postpone execute (“Later”), another popup will appear with a selection of time spans (eg. 5 min, 15 min, etc.) For example, if you know you only need to continue using the device for another couple of minutes because you are just about finished what you are doing, you could choose “5 minutes later” from the menu; E-Robot would then automatically request command execution confirmation again five minutes later.

I would love to be able to use this app, but as of yet I have been unable to figure out how to interpret the “parameters” given to me when I choose to apply any “events” that have to do with the “sensors”. Is it that ANY event from the given sensors triggers an action? I know this is perhaps a stupid question, but maybe you could be more inclusive in your “help” documentation; you only cover Application-, Location- and Time-based events and ignore the rest.
Also, I have been testing the functionality of the “application”-based events, for example turning on/off mobile data when using certain apps, but E-Robot still seems to be less responsive to these particular events than the other app I have been using for this purpose. I love Elixer, use it all the time, but for now I am still in the expirimental stage with E-Robot.
Thank you for your hard work, and I will continue to try to figure out how to use E-Robot to replace some of the other apps I am currently using…
This link of Android documentation maybe help to understand sensors and their parameter better:
http://developer.android.com/reference/android/hardware/SensorEvent.html
I hope new releases of E-Robot will help you to use sensor events easier. I suggest you to write me about problems you cannot do with E-Robot and I will try to help: bartadev@gmail.com
Lehetséges-e két és/vagy kapcsolatban lévő feltételt megadni, pl időintervallum és hely teljesülése estén fut le a parancs.. ha igen, akkor ezt miként kell megcsinálni?
( példa: kapcsoljon ki a wifi és legyen néma a telefon akkor ha elhagyom az “Otthon” helyet és 8-14 óra között hagyom el, ha már 15 órakor megyek el otthonról akkor ne kapcsoljon ki a wifi és ne némuljon a telefon )
Előre is köszönöm a segítséged
A
Két és/vagy kapcsolatban lévő feltétel megadására az És és Vagy operátorokat lehet használni. Mindegyik tetszőleges számú paramétert tartalmazhat, újat hozzáadni a + jellel lehet.
A példádat így csinálnám meg:
Esemény:
-Otthon hely elhagyása
Műveletek:
– Wifi kikapcsolás (feltétel: Idő 8-14 között)
– Telefon némítása (feltétel: Idő 8-14 között)
Ha tényleg egyetlen parancsot sem akarsz futtatni 8 előtt és 14 után akkor az Otthon hely elhagyásához is lehet tenni az idő feltételt és akkor már egyetlen parancs sem fog lefutni.
Köszönöm, meg is értettem, beállítottam, holnap tesztelem is, működik-e…
Egy következő probléma megoldásán gondolkodom, hátha van ötleted, hátha tudsz segiteni.
WAZe nevü közösségi forgalomfigyelő programot használom ( gondolom ismered, ha nem , ajánlom figyelmedbe). Feladat az lenne, ha kocsiba ülök, a robot bekapcsolja a gps-t és elindítsa a Waze programot.
Azt gondoltam, a telefonom gyorsulásmérőjét kéne erre használni, ha kap egy megfelelő gyorsulás értéket. Melyik gyorsulásértéket kell feltételnek adni, gondolom a lineáris gyorsulásmérő értékét?
Gondolom valami értékhez képest kéne megadni, ha több valaminél… E2-ben nézegettem, mit mutatnak a gyorsulásmérők, miközben ülök a kocsiban, de nem lettem okosabb..
Lehet, hogy rossz az egész elgondolás?
Előre is köszi
ui: van már olyan forum, blog bármi a neten, ahol esetleg E-robot használók megosztják egymással a feladat/megoldás dolgaikat?
Szerintem rossz elgondolás. Gyorsulásmérővel nem hiszem hogy tudod deteknálni az autóval való indulást és nem is érné meg az energiafogyasztást. Valaki aki már írta nekem hogy az E-Robot-ot használja autóban bluetooth eszköz kapcsolódáshoz kötötte, gondolom kihangosítóhoz.
Én külön fórumot nem hoztam létre, a legtöbb hozzászólás itt volt eddig:
http://m.mobilarena.hu/hir/alkalmazasbemutato_e-robot.html
De általában ott is én válaszolok.
Is there a forum where people can get help with creating commands and/or share commands they have created?
it is not possible to add wifi network to location in case when network is not configured for access. In my work location i have many wifi networka in scan but not any from them is configured for access so I cant add them as a location trigger
Hi,
I have just added this feature and will be available in the next release.