Elixir 2.30 is available

What is new

  • Airplane mode toggle can be used in JB on rooted devices if you install the latest System add-on
  • New CPU Governor toggle which can be used in widgets and profiles too
  • New CHBS Glasspack 2 icon pack
  • New Files screen: a simple file browser, you can view even system files on rooted devices
  • Elixir 2 can create View file shortcuts so you can easily open files from widgets
  • Profiles: a new Start shortcut action
  • Device information / Processor: displays available frequences and governors; display and set current cpu governor
  • Logcat screen can display logs on rooted JB devices
  • Other small changes, fixes

CPU Governor

If you click on the Processor row on the Device information screen and select the More information option then you can see the list of Available frequencies and Available governors and you can see the current Governor value too:

More information

There is a new Change CPU governor option which can be used only on rooted devices:

Change CPU Governor

The CPU governor toggle displays the current governor setting and a selector dialog appears after you click on it:

CPU Governor toggle

As I wrote before you can set CPU governor in profiles too.

Icon packs

A new improved version of CHBS Glasspack is available with name CHBS Glasspack 2.0 from Gál István:

New icon pack

Icon packs can be downloaded if you click on the right arrow icon on the widget editor screen and select the Customize icons options. After that select the Get icon pack from Web on that screen the same way.

File browser

A new files icon is available on the main screen of Elixir 2:

files

It is a simple file browser with the following features:

  • browse directories; even system directories on rooted devices
  • displays directory creation date and symlink property if the directory is linked
  • displays file modification date and size
  • content of files can be viewed, event system files on rooted devices
  • files can be opened in view or edit mode with the default application
  • files can be filtered by name
  • files can be sorted by name, size or modification date

device-2013-02-01-211308device-2013-02-01-211838device-2013-02-01-211948

This file browser is used to create a shortcut to open a file:

device-2013-02-01-212302

So after this release you can open files from Elixir 2 widgets too:

device-2013-02-01-212656

E-Robot 1.2 is available

What is new

  • New events:
    • Sensors / Device turned over
  • New actions:
    • Set CPU governor
    • Show launcher chooser
    • Text-To-Speech
    • Vibrate (for a time or using pattern)
  • New expressions:
    • CPU governor: returns current governor setting
    • Call state: returns current call state (idle, ringing, offhook)
  • Application-based events: can work on Jelly Bean too; optimization
  • Sensor events: new “higher limit”, “lower limit” and “enter interval” parameters to make sensors easier to use
  • Is Time expression: fix to handle settings like “after 22:00 or before 6:00”
  • Commands screen: new “Enabled” setting to disable/enable commands easily
  • Other small changes, fixes

Enable/disable a command

Using the new Enabled settings you can disable a command without deleting it and it has better performance than setting a constant false condition:

Enabled

E-Robot 1.1 is available

What is new

  • New events:
    • Network connectivity changed: can detect bluetooth, wifi, mobile, ethernet connecting/disconnecting
    • Wifi RSSI dropped: wifi rssi value dropped below the specified value
    • Wifi RSSI raised: wifi rssi value raised above the specified value
  • New actions:
    • Change network mode (2g/3g): can work only with CyanogenMod
    • Show input method picker
    • Start shortcut
  • New expressions:
    • Year: returns current year
    • Month: returns current month of year
    • Day Of Month: returns current day of month
    • Day Of Week: returns current day of week
    • Hour Of Day: returns current hour of day
    • Minute: returns current minute
    • Is Day Of Week: can be used as day filter
    • Is Time: can be used as time filter
    • Volume percent: returns the percent value of the selected stream
    • Wifi BSSID: returns the bssid value of the connected wifi network
    • Wifi SSID: returns the ssid value of the connected wifi network
    • Wifi RSSI percent: returns the rssi percent value of the connected wifi network
    • Battery current: returns the battery current value in mA
    • Battery temperature: returns the battery temperature value in Celsius
    • Battery plugged: returns the battery plugged state (no, ac, usb, wireless)
    • Dock state: returns dock state (unknown, car, desk, he_desk, le_desk, undocked)
  • Battery drained and Battery charged events are optimized
  • Bluetooth device ACL connected/disconnected events: new “device name” parameter for filtering
  • External power connected event: new “type” parameter for filtering (usb, ac, wireless)
  • Network state event: new “bssid” and “ssid” parameters for filtering
  • Airplane mode action: can toggle airplane mode in Android 4.2 (system add-on update is needed)
  • Volume action: “percent” parameter can be an expression instead of a constant value
  • Commands screen: “run command” button uses the confirmation setting
  • Other small changes, fixes

E-Robot is released

What It Is

E-Robot is an automation application which makes it possible for your device to execute commands automatically – all you need to do is define these commands. When you create a command you can specify which actions to execute when a given event occurs. In the Pro version you can set conditions for both events and actions.

The application allows you to specify more than 130 event types and execute more than 50 action types; furthermore, all event and action types can be parameterized, making the app even more versatile, and its functionality may be expanded in the future. E-Robot can handle events which are location-based, time-triggered, application-handled, and more. It can of course execute Elixir 2 profiles as well, so you can automate profile activation easily.

Commands can also be executed manually from the application itself or using shortcuts, and not just automatically as a result of specific events occuring.

Creating a Command

After the application is launched, the welcome screen appears and briefly explains how the program works; following this, click NEW COMMAND at the bottom:

Give the command a name and click [OK]:

After this you will see the main commands screen, which links together Events and their accompanying Actions. The name of the current screen appears top left, next to the icon:

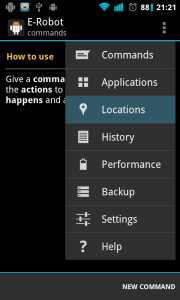
Continuing with the top line there is the “tags” icon, which allows you to organize your commands into GROUPS, and the final icon next to it is a menu which makes it possible to access other features of the application, including E-Robot’s settings.

The next row down contains tabs, one per created command, each bearing the command’s given name. You can jump from one command to the next using these; in the screen capture above there is only one command created (“HELLO”) and so it is the only tab in evidence.

The space which begins below this tab row and which extends almost to the bottom (the “middle” of the screen) is reserved for the definition of the selected command.

Finally the toolbar at the very bottom contains icons which execute actions pertaining to the selected command (as selected using the tabs), and so you can save, rename, delete or execute the command using these (the “+” sign that appears first is to create a new command.)

A command is simply an event→action declaration, i.e. if event(s) occur(s), as defined by you, then you want action(s) to be executed. We have already declared a “HELLO” command; we will now define it to display a welcome notification message whenever the screen is turned on. Thus, in this case event will be defined as the screen turning on, and action will be defined as displaying the specified message. We will begin by adding this event using the + sign on the line marked Events, under the “HELLO” tab:

The event selector screen appears (as witnessed next to the icon top-left) where you define the event. Because of their large number, event types are organized by group, again using tabs (ACCOUNTS & SYNC group, APPLICATIONS group, etc.) Scrolling right through the group tabs will reveal the DISPLAY tab we will use to define this event; you can also click the name of any other tab (convenient if you were already there for another purpose) and you will be presented with the tab header names of all event groups. Using either method go to the DISPLAY tab and select the desired event, which in this case is Screen turned on (Sent after the screen turns on):

The selected event appears on the commands screen:

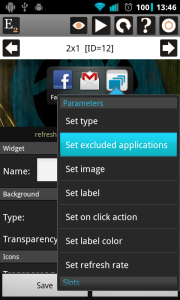
We have defined the event; now we need to define the action to take in case of said event, which is done in virtually identical fashion: click on the + sign on the line marked Actions, go to the OTHER tab (again by scrolling or via list selection by clicking any other tab header) and select Display a notification (Post a notification to the status bar). You will see that this action can be parameterized:

Parameters allow us to configure the action according to need; in this case, scroll down a bit to content text: and its associated value: field below, and type “Hello” (which is the text we wish to display whenever the screen will be turned on as per our “HELLO” command definition). Leave the other parameters untouched for now, then click [OK]:

Our first command is now ready; save your work by clicking the second icon on the toolbar at the bottom. Note that by clicking the execute icon (bottom toolbar, far right) we can test-run our “HELLO” command on-the-fly before trying it for real by power-cycling the display (in this case); either way, pull down the status bar after executing the command and observe the new notification you created, which appears along with the E-Robot logo and the current time:

Application-based Events

Application-based events allow you to execute actions based on application-type events, such as an app launching (i.e. if such-and-such app launches, then do this), stopping, receiving focus, or losing focus. Oftentimes the same commands will be useful for more than one application, so it is useful to organize applications into groups and refer to these app groups as a unit when they are to be part of a command definition.

For example, let’s assume we want to turn Wi-Fi off when using certain applications, because we don’t want them to use internet, but we do want Wi-Fi to be on when certain other apps that really need it are in use. This will be the focus of our next example.

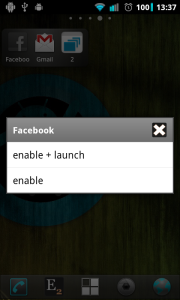
First we need to create a new application group for the apps we don’t want to use Wi-Fi (so the apps which will not be part of this group will automatically be the ones which do need Wi-Fi): using the top right-hand corner menu, select Applications. E-Robot will take a moment to scan the apps installed on your device, then present these apps in list form. At this point we select the applications for which we want Wi-Fi to be disabled (select some apps on your device which you know do not need network access, such as certain games (Hearts® in the example below) and most utilities (such as Link2SD® below). You would not, of course, select an application like Maps®, which cannot function without network access (if unsure, leave the app unselected):

When selection is complete click on the left button of the toolbar at the bottom (with a “+”) to add these applications to a group, then click the [New group] button and select a name for this app group – in this case we will name it “no wifi” – then click [OK]. Looking at the app list now we can see which apps belong to the “no wifi” group because the group name appears in blue below the app name:

We have sorted our apps by creating the “no wifi” group; now we need to leave the Applications screen and go back to the Commands screen to create the commands which will turn Wi-Fi ON and OFF. How E-Robot will determine whether Wi-Fi should be ON or OFF will depend on which application is currently receiving focus. For example, if we are playing Hearts® the focus is on that game, and since Hearts® is in the “no wifi” group, we will define our Wi-Fi OFF command to say that if the “no wifi” group is currently receiving focus (we do this by defining the group itself as a parameter inside the command), turn Wi-Fi OFF. Conversely, if we are using Maps® the focus would be there instead, and since Maps® is not in the “no wifi” group, we need to define our Wi-Fi ON command to say that if the “no wifi” group is not currently receiving focus (again, by defining it as a parameter inside the command), turn Wi-Fi ON.

In brief then, the steps for creating action “Wi-Fi OFF” are:

  • Using the top right-hand corner menu, select Commands
  • Create new command “Wi-Fi OFF”
  • Find event Application group received focus and use it (with parameter “no wifi” group) to define the “Events” field in command Wi-Fi OFF
  • Find action Toggle Wi-Fi and use it with parameter value off to define the “Actions” field in command Wi-Fi OFF

Now create action “Wi-Fi ON”; the steps are identical to above with one exception: the event this action is concerned with is Application group lost focus (i.e. lost focus instead of received focus, as for Wi-Fi OFF).

If done correctly, the screen will look like this:

When you launch an application from your defined “no wifi” group, Wi-Fi will be turned off automatically and if you pull down your device’s status bar you will see this notification:

… and when you are doing anything that does not involve an application from the “no wifi” group, Wi-Fi will be turned on again automatically and the notification message will look like this:

Location-based Events

Some may find the ability to create location-based commands one of the most useful features of E-Robot, giving your device the ability to operate with different settings based on your location. Before creating this type of command we need to first tell E-Robot how we define our locations. As before, we begin with the top right-hand corner menu, only selecting Locations this time:

Locations option

A “How to Use” message will appear; read it, then click NEW LOCATION and select a name (“Home” in the example below). The screen will look like this:

New location

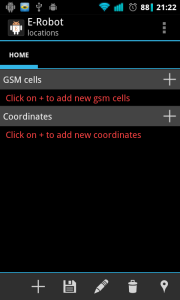
Locations can be defined using cells (GSM or CDMA) or map coordinates. Many people are acquainted with the idea of latitude and longitude-based map coordinates, but perhaps not as many with cells. By “cell” we just mean the area around a cell phone tower base station. Your city has a great many such towers because their effective range is limited, so just think of your city as having been “chopped up” by your carrier into cells with a communication tower in each cell. So using cells to set location just means using the cellular towers closest to you to pinpoint your location.

Cell-based positioning is less accurate than positioning via map coordinates but requires quite a bit less power. Coordinate-based positioning is more accurate but needs either GPS or at least mobile networks to be on.

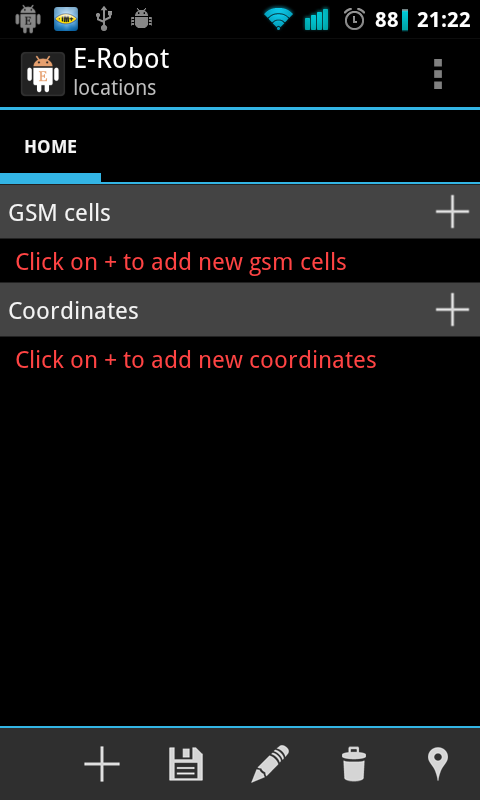
To use cell-based positioning for your current location, click the “+” sign at the far right of the “GSM cells” row (your own device may show “CDMA cells” here, but for purposes of this example the text will make reference to GSM as it is still the most widely used cellular technology in the world). Depending on your location you may get results quickly or it may take a bit longer. In any case, click on “Collect data …” now and let E-Robot scan for area cells:

Collecting cells

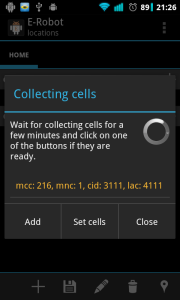
It is suggested you let E-Robot scan for at least 5 minutes to collect data on as many adjacent cells as possible, as it will sometimes take that long to obtain more than a single result. If doing this for home, as in the example, you may get a better result if you walk around your house. And as a final point on the matter, you may find that opportunities arise that let you add new cell info to a location (this will be made clear further along in this section). Whenever you are ready to have E-Robot save the scanned info to the selected location, click on the [Add cells] button.

To use coordinate-based positioning for the same location, simply click the “+” sign at the far right of the “Coordinates” row and tap the “pencil” icon that will appear. The screen will change to the familiar “Maps” look with your location appearing using a red marker. Move the marker to your current location, which may or may not be directly over a blue dot (the blue dot is your device’s idea of your current location using mobile networks alone or mobile networks with GPS enabled) and click [OK], then click [OK] again.

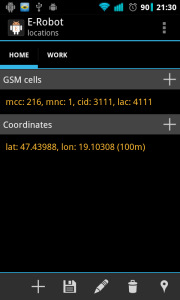
The screen capture below shows the results of both of the above procedures being performed on a HOME location, with the info from a single cell appearing under “GSM cells” and the latitude/longitude info for the same location appearing under “Coordinates”. A second location (“WORK”) has also been created, although we cannot see its data here:

Locations

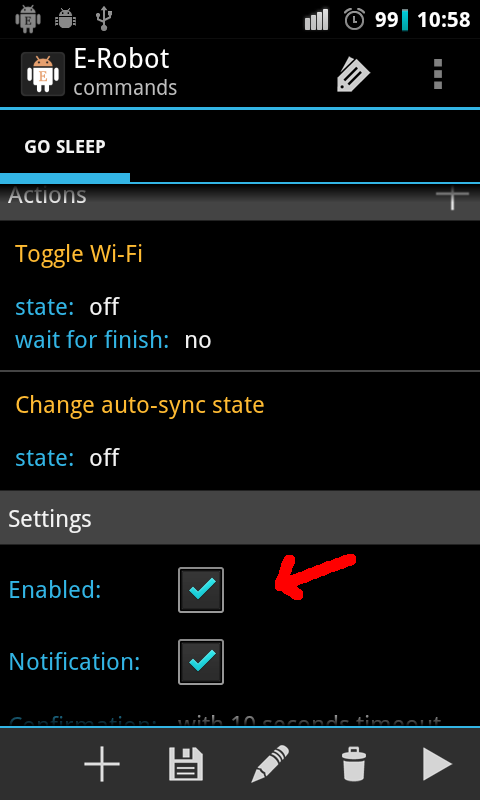
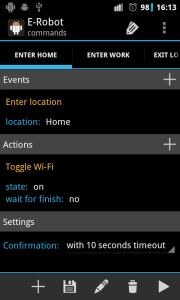
At this point you would go back to the Commands screen using the main menu and create the command(s) you wish your device to execute when you find yourself at the locations you have defined (eg. HOME and maybe WORK). You would define your event by searching for Enter location” under the LOCATION & SECURITY tab and pointing to the “Home” (or “Work”) parameter from the list which would now appear. You would then choose to toggle Wi-Fi ON (for example) under the WIFI tab, which would accomplish the goal of always having Wi-Fi turned on when we are at home. The “with 10 seconds timeout” confirmation at the bottom is simply the user’s preference of having a notification message appear for ten seconds upon action completion, in this example:

Enter locations

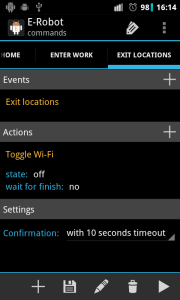
Assuming we have defined only two locations, HOME and WORK, can we specify what we would like E-Robot to do if we are at neither location? The answer is yes, we can do so using Exit locations” which is also under the LOCATION & SECURITY tab. Below we see a command which has been created to ensure Wi-Fi is OFF when we are at neither location:

Exit locations

As a final word on location-based events, note that it is technically possible that E-Robot believes you have left a location that you have not really left and acts on it, by, using the above example, turning Wi-Fi off. The way this can happen is if your device communicates with an adjacent cell you hadn’t yet added to your current location, probably because it was not visible at the time you had defined the location. If this were to happen you would be able to see it in the notification area (note at 21:41 “Last command: Exit locations”):

Robot exited from locations

If you were to then click on this notification you would access the History screen (which is also always accessible through the main menu) on which you could see a history log of executed commands:

History screen

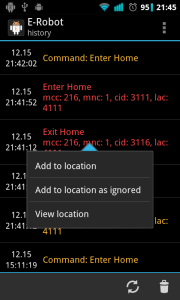
Using the History screen would allow you to determine why in this case E-Robot thought you were no longer in any of your defined locations. For example you would be able to see the cell info that was not defined as part of your location and which consequently triggered the corresponding exit action(s). If you know you really were at the location in question, you could click on the row in the History with the new cell data and add it to the location, but you may also choose to define the cell as an “ignored cell (by clicking “Add to location as ignored” in the screen capture above). You would do this if it was a “fluke”, meaning in this case that your device communicated with a remote cell, as occasionally happens. Adding the fluke cell to the location as an ignored cell offers the advantage that, if it were to ever happen again, E-Robot would not react as if you left your location (unlike the first time), but neither would E-Robot react as if you entered your location were it to encounter this cell (and thus erroneously trigger “Enter location” commands). It is in this important way that “Add to location as ignored” differs from the more basic “Add to location”.

Time-based Events

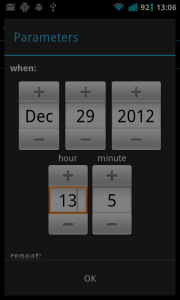
You can schedule actions to occur at predetermined times using the Alarm event to be found under the DATE & TIME tab. These alarms can be one-time events or repetitive. Clicking the “Alarm” event brings up the screen below, where the desired date and time of the event can be specified:

When parameter

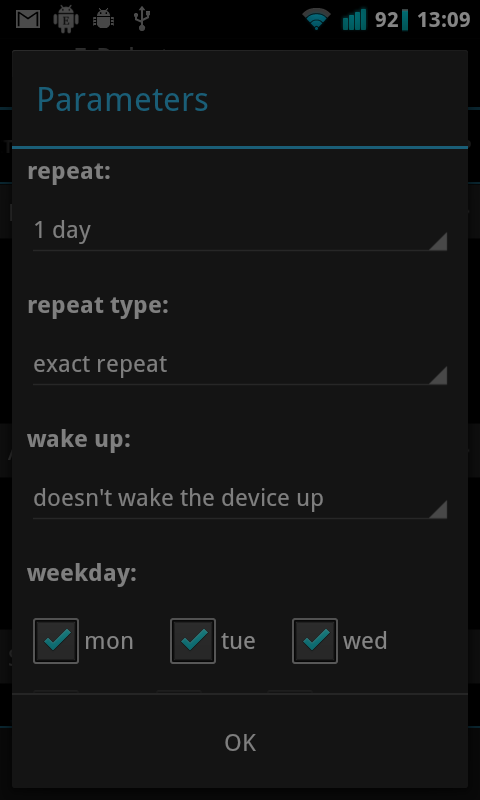
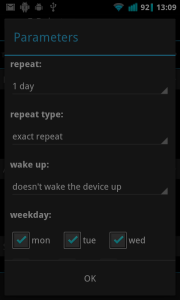
Scrolling up reveals parameters which can be set, such as the repeat interval for a repetitive alarm, as well as which day(s) of the week it should be active:

Repeated events

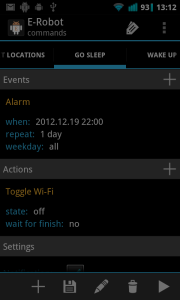
One use for a repetitive alarm event is to turn certain things on or off at the same time every day. For example, keeping the device from continuously scanning for Wi-Fi network connections at night would be useful in preventing unnecessary battery drain. A command to accomplish this might look something like the screen capture below, which shows a command which will turn Wi-Fi off at 10:00 PM (22:00) every night:

Go Sleep command

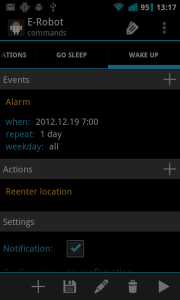
It would then be desirable to allow Wi-Fi scanning to resume every morning. But instead of just creating the obvious Wi-Fi On command, why not use your location in the morning to determine Wi-Fi settings? This is a neat way of combining two features of E-Robot. It works like this: first, you need to already have your Wi-Fi-related location-based events defined, as explained in the previous section (i.e. events that do “when I’m here turn Wi-Fi on” and “when I’m there turn Wi-Fi off”). Once those are set up, you can set up an alarm here like in the previous example but eg. for 07:00 AM, only when it comes to defining your action you would choose, from the LOCATION & SECURITY tab, Reenter location (instead of simply “Toggle Wi-Fi”). This would have the added attraction of deciding how to toggle Wi-Fi in the morning based on your location at that moment, instead of just turning it on blindly. This is what was done in the screen capture below:

Wake Up command

Confirmation of Command Execution

As expected, all of the command examples in this documentation perform their action(s) based on their respective command’s associated event(s), as defined by the user, but they also have one other thing in common: the actions are all performed automatically once the conditions are met. Is this not to be expected? It certainly is, as it is the basic idea behind E-Robot. But we need to introduce here an idea we have not yet considered: the fact that automatic command execution can, in certain instances, actually be annoying.

Let’s imagine we created a command that automatically turns Wi-Fi off at 10:00 PM (22:00) every night, because we tend to retire for the night shortly thereafter (we have seen such an example earlier in this documentation). But what if, once in a while, you wish to continue using your device – AND therefore Wi-Fi – for a while longer, say an extra hour or so. It would obviously be irritating if your device automatically toggled Wi-Fi off at 10:00 PM on those nights. If this were to happen you could just manually turn Wi-Fi back on of course, but this would defeat the purpose of E-Robot somewhat.

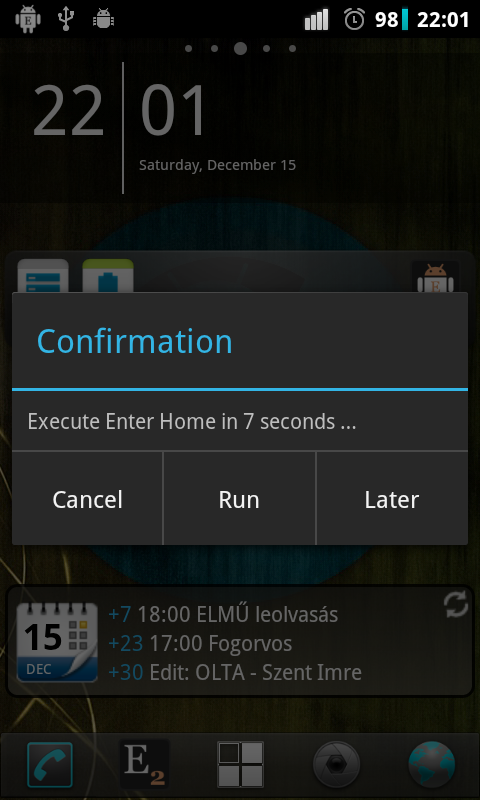
E-Robot has foreseen such eventualities and offers a more elegant solution by allowing one to specify that a time-delimited confirmation be associated with the execution of a command, allowing the user to postpone (or outright block) execution of said command.

Exit locations

As can be seen in the screen capture above, command confirmation is enabled simply by clicking the “Confirmation” field that appears toward the bottom of the screen when defining commands. A choice of time spans (eg. 10 sec, 30 sec, etc.) will appear, or you can choose “no confirmation” if you’ve thought better of it. Confirmation of command execution may be specified whenever the field appears under “Settings” on the Commands screen where commands are defined.

Note that confirmation of command execution is only useful if the device’s user (you) are physically close enough to the device at the time it was set to appear; otherwise, the command will execute automatically after the specified confirmation time has elapsed. If you are present, you will see the popup confirmation (see final screen capture below) and may choose to outright cancel execution of the command (“Cancel”), execute it immediately after all (“Run”), or postpone execution (“Later”):

Confirmation

If you choose to postpone execute (“Later”), another popup will appear with a selection of time spans (eg. 5 min, 15 min, etc.) For example, if you know you only need to continue using the device for another couple of minutes because you are just about finished what you are doing, you could choose “5 minutes later” from the menu; E-Robot would then automatically request command execution confirmation again five minutes later.

Elixir 2.29 is available

What is new

  • Application launcher widget: can work in disabler mode which makes it possible to disable an app or re-enable and launch it
  • Application launcher widget displays icon of a disabled application in transparent grayscale
  • E-mail unread count widget: password fix for JB (reconfiguration needed) and can open selected account with new Gmail app
  • NFC toggle can toggle nfc directly on rooted devices if you install the latest System add-on
  • Running applications widget has a new “excluded applications” parameter to exclude applications
  • Volume profile toggle: an Edit button is placed at the bottom of the dialog to make it possible to change volume profiles
  • Widgets can be added to lock screen of JB devices (Android 4.2)
  • Device info screen display CPU freq more accurate
  • Ukrainian and italian languages can be selected as in-app language
  • Other small changes, fixes

Launch applications in disabler mode

There is a new disabler mode for launching applications from a widget. This mode is available only for rooted devices. To enable this mode for an application open the widget editor and click long on the application launcher icon then select the Set: disabler mode (root) option and enable it. If you save the widget and click on the application icon a popup appears where you can launch or disable the application:

Launch or disable application

If you disable the application then its icon will be grayscaled and you can enable and launch it if you click on it:

Enable and launch application

This feature could be useful if you want to disable an application because of its background jobs and still keep it easy to launch.

Hide applications from Running applications widget

You can exclude applications from the running applications widget by clicking long on the widget on the widget editor screen and selecting the Set: excluded applications option:

Exclude applications

This is useful if you want to avoid some applications which run most of the time for example launchers.

Elixir 2.28 is available

What is new

  • New widget type: Battery voltage
  • New widget type: Volume profile selector toggle, can open selector dialog or toggle between profiles
  • CPU freq widget can display current freq, min freq or max freq as label
  • Ringtone toggle: custom ringtone can be picked and activated
  • Airplane mode toggle: opens system settings screen from Android 4.2
  • Next alarm widget: new label and image when alarm is not set
  • Device info screen / cpu row: uses red progress bar
  • Ukrainian and italian language
  • Other fixes and small changes

Battery voltage widget

There is a new battery voltage widget which displays voltage as label and opens the Battery usage screen by default if you click on it.

Volume profile selector toggle

This new toggle makes it possible to activate a volume profile faster. This toggle displays the latest activated profile as label and opens a dialog to activate a profile when you click on it. Using this toggle you can activate any profile with only two clicks:

If you have only two profiles then you can set this toggle to toggle directly between profiles without opening the dialog. Open the widget editor screen, click long on the toggle and set the Set open dialog option to false to activate this feature. In this case you can switch between profiles with only one click:

Custom ringtone

If you click on the Ringtone toggle then there is a new Open button at the bottom of the dialog. If you click on it you will be able to open a custom ringtone if you have an application to pick a file. For example I have ES File Explorer which makes it possible to select an mp3 file and set as a custom ringtone. After you did it this ringtone will be displayed right in the ringtone selector.

Using this new feature you can set custom ringtones with profiles too.

Elixir 2.27 is available

What is new

  • New widget type: Screen Orientation toggle
  • Flash toggle changes screen timeout when white screen is used
  • Optimization of Recent applications widget type
  • Optimization of Shortcut widget types
  • Optimization of Wallpaper toggle
  • Tethering & hotspot, Wifi hotspot system screens can be opened from widgets and device info screen
  • Restore backup files fix
  • Small changes and bugfixes

Changing screen orientation

There is new Screen orientation toggle you can use in widgets and profiles:

If you click on the toggle you can select the orientation you would like to use:

You can change back to normal operation by selecting default.

If you click long on the toggle on the widget editor screen then you can assign an orientation to the toggle. If you do so then to toggle will switch between the selected orientation and the default setting.

Elixir 2.26 is available

What is new

  • Improved battery current detection, displays estimated current value on devices which aren’t supported
  • Recent app widget: hide app labels, exclude applications, longer app list, keep app list after reboot, remembers last index, …
  • Uptime widget: new “sleep ratio” label type
  • Volume dialog: ring and notification volumes can be linked/unlinked from ICS
  • Contact dialog: items can be hidden
  • Shortcuts for volume profile selector and for volume profiles
  • Statusbar icon can display brightness percent value
  • VPN settings can be opened from widgets as action or from device info screen
  • Other small changes and bugfixes (widget fix on Android 2.1, license checking improvements)

Battery current

Battery current widget wasn’t available on every devices before but from this version you can use it on every device. If an accurate current value isn’t available then the widget calculates an estimated current value from battery usage. In this case if you create a battery widget it will display – character for while, until battery level changes. After a change it will be able to calculate current value for the last period from elapsed time, delta battery level and battery capacity you have to set for the widget in mAh.

Recent application improvements

Recent application widget changed a lot in this version:

  • You can hide application labels if you check Hide app labels on the widget editor screen.
  • The widget editor can remember the last set index parameter and it makes it easier to add multiple recent application slot to a widget.
  • You can exclude applications from the recent applications list if you don’t want to see them there. To do it click long on a recent application slot on the widget editor and select the Set: excluded applications option, select the applications you want to exclude and save the widget. This is a global-scoped parameter so you have to set it for only one slot.
  • Refresh rate parameter has global scope so if you want to change refresh rates of recent applications then you can change it on only one slot and every other slot will use this setting.
  • Removed and unavailable applications will be removed from the recent applications list so no empty slots anymore.
  • Can display longer list of recent applications not only those which are retrieved by the system.
  • Recent applications list won’t be lost after reboot.

Link/Unlink ring and notification volumes from ICS

Ring and notification volumes are linked together on ICS devices. If you create a widget with a Volume toggle and click on it to open the volume dialog then you can see a chain icon in the row of Phone ring. Click on this icon to link or unlink ring and notification streams. If they are linked then ring volume changes if you change notification volume. If you unlink them then you can set ring volume separately. This is an Elixir-specific setting and will be used if you have a new call and work only if you have a home screen or statusbar widget with volume toggle.

Hide items from contact dialog

If you use a Contact widget with Elixir menu then it is possible now to hide items. So if you don’t want SMS rows or Work numbers to be shown now you can hide them. It is very easy to do that:

  • Open the contact dialog
  • Click on the eye icon in the header
  • Uncheck rows you want hide
  • Click on the eye icon again

Activate volume profiles with one or two click

If you have Elixir 2 installed then you can create shortcuts for volume profiles. If you click on the shortcut then the volume profile will be activated immediately. You can create shortcut for volume profile selector too. If you click on it then a dialog appears where you can select which profile you would like to activate.

Elixir 2.25 is available

What is new

  • New widget types: wifi name, wifi link speed
  • Displaying toggle change messages can be disabled in widgets
  • Flash toggle: new turn screen off parameter if you want to turn screen off while using flash
  • Running applications widget: applications can be stopped right there
  • Widget refresh rate parameter has a “default” option which displays what is the default value
  • List type parameter dialogs now display the currently selected option
  • Default launcher and Task Manager of Samsung Galaxy S3 can be launched from widgets as an application or action
  • Profiles keep the order of actions you created and you can reorder actions by dragging the icon
  • Other small changes and bugfixes (gingerbread widget sizes)

Disabling toggle change messages

By default if you click on a toggle a toast message is displayed about the state changing. You can see this message at the bottom of the first screenshot. If you would like to disable these messages for a widget open the widget editor and turn Show state change message off then save the widget.

Stop applications right from widget

If you use Running applications widget then you can stop an application right from the popup dialog. There is an X icon for every application and if you click on it will stop the application, kill the process or open the system screen where you can force close it. The method depends on the process you selected and whether you have a rooted device or not.

Widget list parameters dialog

If you change a value of a list type parameter of a slot on the widget editor screen then it displays the currently selected option as a checked checkbox.

The other change you can see on this screenshot is that the refresh rate parameter has a new option in form default – 1 minute which makes it possible to change back to the default value and you can see what is the default value:

Order of Profile actions

The order of profile actions can be important in some cases so from this version of Elixir 2 the actions of profiles keep the order you created them, there is no automatic reordering anymore. If you would like to change the order later you can drag the icon of an action and drop to anywhere easily.

Elixir 2.24 is available

What is new

  • New screen for applications to check details, permissions, broadcast actions and enable/disable components
  • New accessibility service to make it possible for statusbar widgets to stay on top on ICS or newer devices
  • Statusbar widgets can work directly (without widget window) on pre-ICS devices
  • Widget visual feedback of clicking
  • E-mail unread count widget can handle folders
  • Volume toggle: levels parameter to toggle between these predefined values of the selected stream
  • Application language setting
  • New languages: czech, chinese traditional
  • Other small changes and bugfixes (mobile network toggle)

New application screen

If you click on an application on the applications screen then there is a new View details option to open the new details screen of an application. This screen displays the most important details of the application and the list of activites, providers, receivers, services and permissions. If you click on the name of the application or a component item then you can see the More information dialog which displays other attributes. If you scroll down you can see both the requested and declared permissions and theirs description:

If a component of the application is disabled then the name of the component and the button are darker. If you have a rooted device then you can disable or enable a component (an activity or a receiver). Be careful because it can cause misbehaviour in the application. But it is a good feature if you don’t want an application to start after boot or receive sms for example:

Statusbar widget improvements

On ICS it is not possible for a widget to stay on top in the notification area. This new version of Elixir 2 has a new Elixir accessibility service which is able to keep statusbar widgets on top. If you enable the service then it can detect if a new notification is displayed so it can update the statusbar widget to be above others. It this service is disabled then a new warning message is displayed on the widget editor screen.

If you click on the Settings button then it goes to the Accessibility settings screen where you can select Elixir and turn it on. After you do it the widget should jump to the top and stay there.

The statusbar widgets work directly from the notification area only from ICS devices. On earlier devices it just opened a widget window where you had to click on a widget again. From this version of Elixir the statusbar widgets can work without that extra window. You need not to do anything to make it work.

Widget visual feedback

There is a small but useful change in widgets: visual feedback if you click on a slot of the widget. You can see it on this screenshot where the GPS toggle is clicked (4th icon in the 2nd row):

IMAP folders

The E-mail unread count widget has a new Folder attribute where you can set the name of the folder. The widget will display the number of unread emails in this folder. If you leave it empty then the default INBOX folder will be used. If you don’t know the name of the folder then you can click on the list icon to get the list of folders. You have to set the account (e-mail and password) right to be able to get the folder list:

Volume toggle

The volume toggle has a new levels parameter similar to the screen timeout or brightness toggles. If you set levels to value 30 50 100 for example then this toggle won’t open the dialog but will change volume level of the selected toggle to 30% then 50% if you click on it again and then finally to 100%. It is possible that you set the level to 50% but it will change to 54% if you click on it because volume levels has only a few predefined values and it will change to the nearest one.

Application language

You can change the language of Elixir 2 if you click on the configure icon on the main screen or of the Widget app if you click on the configure icon on the widget editor. They are two separate application so you can set their languages independently. After you changed the language application restart is needed. There is a default option which means that the application language will be the system default or english if system default isn’t supported.